Pages

Wednesday, November 24, 2010

Pumpkin Cupcakes With Maple Cream Cheese Frosting And A Giveaway!


So the past two days have been SNOW DAYS here in Seattle! That makes my Thanksgiving break extended by 2 days! Yay! Speaking of Thanksgiving, Thanksgiving is here! Well, it's tomorrow but still...Thanksgiving is here!! I don't know about you but it has come just at the right time. I'm fully prepared to stuff my face with delicious food and be around family. I live for the holidays because it's one of the only times out of the year where the whole family gets together. There's just something about it that makes you all happy inside. Anywho, so it's Thanksgiving so it only seems logical to have a Thanks-giveaway! So if you haven't checked out CSN Stores after my multiple posts about CSN Stores, get to it!! Get coffee tables, a lamp, heck even get yourself a huge fountain! Whatever makes you happy. I'll talk about this later.

In honor of Thanksgiving, why not make something pumpkin related. This was my first time working with pumpkin and it was well...Interesting? ha. It was fun working with a new ingredient because I was able to increase my "Ingredient Use Count". You can read on for the end results of these cupcakes late on as well.

Now, back to what you've all been waiting for, the Thanks-Giveaway. CSN Stores is giving you the chance to win a $45 Gift Certificate for any of their online stores! I repeat, $45 Gift Certificate!! Here's how to enter:

You must be a follower of "AJ's Cooking Secrets" through the Google Friend Connect located on the left side bar of my blog to enter this giveaway. If you are not a follower, your entry and/or entries will not be counted.

You have THREE chances to enter!!
1. Leave a comment stating what you would like to buy from CSN Stores with the $45 Gift Certificate, along with your email.
2. Become a fan/liker of my Facebook Fan Page : AJ's Cooking Secrets and leave a comment below stating that you have become a fan/liker. If you are already a fan/liker of my FB Fan Page, leave a comment stating that you are.
3. Follow me on Twitter @aaronjohn04 and leave a comment below stating that you have become a follower. If you are already a follower of my twitter page, leave a comment stating that you are.

Important Guidelines:
-Must be a follower of this blog, "AJ's Cooking Secrets", through Google Friend Connect located on the left side bar for your entry/entries to count. Anyone who "enters" without being a follower of this blog will not be entered into the drawing.
-The Giveaway will last until Wednesday, December 1st, 2010 at 11:59 PM PST. The winner will be drawn using Random.org. The winner will then be announced in a blog post, on my facebook page and emailed that they are the winner. From there, the winner will be contacted by CSN Stores where you will receive a Gift Certificate Code.

Tips
-It's a fairly straightforward recipe so don't over mix the batter and don't over bake your cupcakes. Stick a toothpick into the cupcake and if there's a tiny bit of crumbs that stick, it's ready to take out. Some people say to take them out when a toothpick is clean but you have to remember that the cupcakes will somewhat continue to cook because of the heat that is retained in the pan and the cupcake itself.

Results
Taste: The cupcake itself was very reminiscent of a carrot cake in terms of the flavor of the spices but with the slight flavor of pumpkin instead of carrots. I personally felt it was missing an a "lil' somethin' somethin'". The Maple Cream Cheese frosting didn't taste like Maple. Maybe because I used a tablespoon of maple syrup instead? But it was missing that Maple flavor. 

Texture: Definitely a moist cupcake because of the use of the pumpkin and the oil. The frosting was smooth and creamy.


Pumpkin Cupcakes With Maple Cream Cheese Frosting (Makes 10 cupcakes)
Recipe by Ina Garten

Ingredients
1 cup all-purpose flour
1 teaspoon baking powder
1/2 teaspoon baking soda
1/2 teaspoon kosher salt
1 teaspoon ground cinnamon
1/2 teaspoon ground ginger
1/2 teaspoon ground nutmeg
2 extra-large eggs, at room temperature
1 cup canned pumpkin purée (8 ounces), not pie filling
1/2 cup granulated sugar
1/2 cup light brown sugar, lightly packed
1/2 cup vegetable oil
Maple Frosting (recipe follows)
1/2 cup coarsely chopped Heath bars, for serving (2 1.4-ounce bars)

Directions
Preheat the oven to 350 degrees. Brush or spray the top of 10 muffin tins with vegetable oil and line them with 10 paper liners.

Into a medium bowl, sift together the flour, baking powder, baking soda, salt, cinnamon, ginger, and nutmeg. In a larger bowl, whisk together the eggs, pumpkin purée, granulated sugar, brown sugar, and vegetable oil. Add the flour mixture and stir until combined.

Divide the batter among the prepared tins (I use a level 2 1/4-inch ice cream scoop) and bake for 20 to 25 minutes, until a toothpick inserted in the center comes out clean. Set aside to cool completely.

Spread the cupcakes with the Maple Frosting and sprinkle with the chopped toffee bits.

Maple Cream Cheese Frosting
6 ounces cream cheese, at room temperature
3 tablespoons unsalted butter, at room temperature
1/4 teaspoon Boyajian Natural Maple Flavor
1/2 teaspoon pure vanilla extract
2 cups sifted confectioners' sugar

In the bowl of an electric mixer fitted with the paddle attachment, cream the cream cheese and butter on low speed until smooth. Stir in the maple flavoring and vanilla extract. With the mixer still on low, slowly add the confectioners' sugar and mix until smooth.

-Aaron John

Friday, November 19, 2010

Apple Crostata


So, this past week was a week of decisions. First, I needed to decide what classes to take this coming Winter Quarter. Second, I had decide what major would be best for me. Third, I had to decide what to do with my other blog "AJ's Food Adventure". Well, I decided on things for all three. I've decided to go along the Biochemistry path. I figured, it may be hard and difficult but if I keep giving up, where will I end up? I need to stick to this major, not have doubts and have confidence that I can pull through. Second, going on the Biochemistry path involves taking the next level of Biology classes which I am fully prepared to do. Finally, I have decided to discontinue my other blog "AJ's Food Adventure" within the next week or two. Why? I don't use that blog that often, if at all. "AJ's Food Adventure" started my "blogging career" and now it's time to let it go. It's sad to have to let it go but I feel it's time. Overall, life is full of decisions so "Live YOUR Life. Choose YOUR Path"

With the kind of weeks I've been having, I needed comfort in the form of Apple Crostata. An opened faced pie that doesn't require a pie pan? Say Whaaa?! In addition, it's extremely easier to slice a piece from this "circle of goodness" than it does by digging into a full deep dish apple pie. Sure, deep dish apple pies are a show stopper but this Crostata has the same flavors in a nice compact little package. :)

Tips
-Feel free to make the dough in a bowl with pastry cutters or forks. I, myself, used the fork method. The trick is to break down the butter enough to where the butter is the size of peas. With chunks of butter running through the dough, it guarantees a flakey Crostata

-The dough will seem dry when using pastry cutters/forks. My suspicion is using the forks doesn't produce heat whereas a food processor does. This heat will cause a tiny bit of the butter to melt slightly to add moisture to the dough. Don't get nervous though. Just work the dough a little bit until it comes together. Don't handle it too much because you want butter pieces. 

-When the baked Apple Crostata is cool enough to handle, lift the parchment paper and slide the Apple Crostata on your serving platter. Lifting the Crostata with spatulas will cause the Crostata to break. 

Results
Taste: A slight tang from the apples, sweet yet savory and buttery quality to the crust, and "spicyness" from the addition of cinnamon to scream Fall/Winter. Essentially, an apple pie that's 10 times easier

Texture: Apples were tender yet still al-dente and the crust was flakey. Definitely a great sign of a properly baked apple dessert! 

Apple Crostata
Recipe by Giada De Laurentiis

Ingredients
Crust:
1 1/2 cups all-purpose flour
2 tablespoons sugar
1/2 teaspoon salt
10 tablespoons (1 1/4 sticks) unsalted butter, chilled, cut into 1/2-inch pieces
3 tablespoons ice water
Filling:
2 small Golden Delicious apples, peeled, halved, cored, cut into 1/8-inch-thick slices
1 Pippin apple, peeled, halved, cored, cut into 1/8-inch-thick slices
1/4 cup plus 1 tablespoon sugar
1 teaspoon fresh lemon juice
1 large egg white beaten with 1 tablespoon of water (for egg wash)
2 tablespoons sliced almonds, toasted

Directions
To make the crust: Mix the flour, sugar, and salt in a processor. Add the butter. Pulse until the mixture resembles a coarse meal. Add the ice water and pulse until moist clumps form. Gather the dough into a ball; flatten into a disk. (If the dough still crumbles and does not form into a ball, add another tablespoon of ice water.) Wrap the dough in plastic and refrigerate until firm, about 1 hour.

For the filling: Position the rack in the center of the oven and preheat the oven to 400 degrees F.

Combine the apples, 1/4 cup of sugar, and lemon juice in large bowl; toss gently to blend. Set aside for 10 minutes.

Meanwhile, dust a large sheet of parchment paper with flour and roll out the dough on the paper to an 11-inch round. Transfer the dough on the parchment paper to a heavy large baking sheet. Spoon the apple mixture over the dough, leaving a 2-inch border. Fold the dough border over the filling to form an 8-inch round, leaving the apples exposed in the center. Pleat loosely and pinch the dough to seal any cracks. Brush the crust with the egg wash and sprinkle with the remaining 1 tablespoon of sugar.

Bake the crostata until the crust is golden and the apples are tender, about 40 minutes. Transfer the baking sheet to a rack; cool for 10 minutes. Slide a metal spatula under the crust to free the crostata from the baking sheet. Cool the crostata to lukewarm. Sprinkle with the almonds and serve.

-Aaron John

Saturday, November 13, 2010

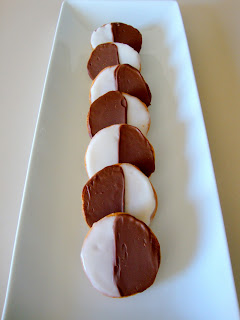
Black And White Cookies


Once again, I'm at the point where I'm confused about school and major. Just a month ago I said I was either going into Pre-Nursing or Biochemistry/Pre-Pharmacy. However, after receiving my Biology Midterm yesterday, I felt so depressed because I bombed it. I studied hard for this test, read the book, went over reading quizzes and practice exams, did a plethora of past exam questions and I still did badly. When going into the test, I felt somewhat confident that I can get an 80% but my grade said otherwise. 

I don't believe that the problem is me or the professor. I believe the problem is in the grading techniques of the TA's. They are brutal in grading that if one misses one part of the question, one essentially gets the whole question wrong. For instance, in one of the questions I had, it was a three part question. It was essentially simple math. The answers were t + 1/2 U, 0.13 and 0.185. My answers were t + 1/2 U, 0.06 and 0.185 which meant I only got the second part wrong. This question was worth 6 points and I only got 2 points when I had 2/3 of the question right! Shouldn't I get 4 points?! There are a bunch of these types of grading on my test. I'm definitely taking this in for a re-grade. 

Enough of my rant, but I'm still confused about what I'm going to do with my life. Why can't life be clear cut like Black and White Cookies? It's either chocolate or vanilla, the simplest flavors that are the best out there. Why can't my life be as easy as choosing whether I like chocolate or vanilla better? Why can't I get a good grade in this Biology Class? If I were to take this Biology Class somewhere else, I would probably be excelling but I guess I will never know...But most of all, where is this road of life going to take me?

Tips
-I actually had difficulty with the chocolate glaze. It didn't come together when I made it in the microwave. Now, you may be saying "This guy probably doesn't know how to melt chocolate in the microwave" but let me tell you, I have melted chocolate in the microwave 43829025489042 times without any problems. lol. In fact, because of the failure of the chocolate glaze I melted milk chocolate in the microwave and slathered it on the cookie instead. I don't know what exactly went wrong with the glaze but it ended up becoming extremely grainy. Instead of microwaving it, I would suggest using a double boiler to do it.

Results
Taste: Beyond delicious!! Chocolate Lover? Vanilla Lover? This cookie has the best of both worlds. A subtle vanilla flavored cookie that has half tasting like vanilla and the other tasting like chocolate. My personal favorite was the chocolate part. hehe

Texture: The cookie is very cake like. Somewhat crisp around the edges. The slathering of icing gives another textural difference to the cookie. Almost crisp and creamy at the same time. 

Black and White Cookies (Makes about 16 large cookies)
adapted from Gourmet Cookbook via Joy The Baker
Ingredients
For the Cookies:
2 1/2 cups all-purpose flour
1 teaspoon baking soda
1 teaspoon salt
2/3 cup well-shaken buttermilk
1 teaspoon vanilla
2/3 cup unsalted butter, softened
1 cup granulated sugar
2 large egg

For Vanilla Glaze:
2 cups powdered sugar
1 Tablespoon light corn syrup
1/2 teaspoon vanilla extract

For Chocolate Glaze:
4 ounces semi-sweet chocolate
3 Tablespoons butter
1 Tablespoon light corn syrup

Directions
Preheat oven to 350°F.

Whisk together flour, baking soda, and salt in a bowl. Stir together buttermilk and vanilla in a cup.

Beat together butter and sugar in a large bowl with an electric mixer until pale and fluffy, about 3 minutes, then add eggs, beating until combined well. Mix in flour mixture and buttermilk mixture alternately in batches at low speed (scraping down side of bowl occasionally), beginning and ending with flour mixture. Mix until smooth.

Spoon 1/4 cups of batter about 2 inches apart onto a buttered large baking sheet. Bake in middle of oven until tops are puffed and pale golden, and cookies spring back when touched, 15 to 17 minutes. Transfer with a metal spatula to a rack and chill (to cool quickly), about 5 minutes.

To make the glazes-

In a bowl, whisk together the powdered sugar, 1/2 teaspoon vanilla extract, 1 tablespoon of corn syrup and 2 tablespoons hot water, until smooth. That’s your vanilla glaze.

In a separate bowl, melt the butter and the chocolate in a microwave for about 1 minute. Add the corn syrup and stir until smooth. That’s your chocolate glaze!

Once the cookies are cooled, face them all bottom side up of a clean surface. Spread half of the cookie with vanilla glaze and the other half with chocolate glaze. Refrigerate for 20 minutes to set. And…Yum!

-Aaron John

Saturday, November 6, 2010

Peanut Butter Cookies


I'm excited for this weekend because we get an extra hour of weekend!! So, don't forget you turn that clock one hour back. Anytime you have an extra hour to do anything, it's always a good thing! :)

Today, I am reintroducing myself to the Peanut Butter Cookie. Now, I say "reintroducing" because many years ago in probably the 3rd grade, I ate a Peanut Butter Cookie for the first time and it was horrible. I remember it was from the "Grandma's" cookie package. You know, the one that came with two huge cookies? Well, I ate one of them and it was super soft, almost soggy. Generally, I don't enjoy eating the "Grandma's" cookies because of this overly soft, weird soggy texture. Am I the only one that feels this way? There is definitely a difference between these cookies and a home made one. Just because I haven't eaten a Peanut Butter Cookie since this incident, it doesn't mean I haven't eaten a cookie with peanut butter. I love Nutter Butters. Those are super delicious. A peanut butter flavored crunchy cookie filled with peanut butter! Say Whaaa?! So GOOD! However, today we're talking about the circular, chewy, Peanut Butter Cookie.

As usual, I began my search for a Peanut Butter Cookie with great reviews and so I ended up with this recipe from Gale Gand. I remember when she was on the Food Network and had her show "Sweet Dreams". I loved that show! However, her show always aired when I was at school. So, every time we had a half day at my elementary school, I would rush home just to watch it. I'm sad to say, that show is now gone :( At least now I can re-live this show by making some of the desserts she made like these cookies.

Tips
-These Peanut Butter Cookies are supposed to be sandwich cookies but I didn't make them into sandwiches.

-Don't be afraid of the baking temperature of 400 degrees F. I was skeptical of the temperature but I just went with it and my cookies turned out great in about 7 minutes!

Results
Taste: Subtle peanut flavor, not too sweet.

Texture: Not exactly chewy. More on the crumbly side.

Peanut Butter Cookies
Recipe from Gale Gand
Ingredients
1/2 cup butter
1/2 cup sugar
1/2 cup brown sugar
1 egg
1/2 teaspoon vanilla
1 1/2 cups flour
3/4 teaspoons baking soda
1/4 teaspoon salt
1/2 cup peanut butter
Grape jelly ice cream, recipe follows

Directions
Preheat oven to 400 degrees.

Cream the butter well in a mixer with a paddle attachment. Add the sugars and continue to mix well. Add the egg and vanilla and mix well. Sift the flour with the baking soda and the salt then add it to the mixer and blend. Add the peanut butter and mix well. Roll into 1/2-inch balls and place on a greased sheet pan 1-inch apart. Press a fork down on the surface lengthwise then crosswise to make a grid pattern. Bake for 5 to 8 minutes at 400 degrees until light golden brown. Let cool on the pan.

Place a small scoop of grape jelly ice cream on the bottom (flat) side of a cookie and top with another cookie to make a sandwich. Place in the freezer and repeat with the remaining cookies.

Grape Jelly Ice Cream
Ingredients
1 quart vanilla ice cream
1/2 cup grape jelly

Directions
Fold grape jelly into vanilla ice cream, leaving some streaks of jelly. Freeze until ready to use in the sandwiches.

Peanut Butter Cookies on Foodista
-Aaron John
My Food Outings: AJ's Food Adventure
Facebook Fan Page