Pages

Sunday, January 26, 2014

Cake Donuts


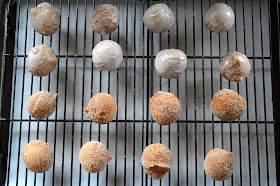
First of all, sorry for the blurry pictures. When you live in Seattle, the lighting isn't always picture perfect for these kinds of things. Oh well, who cares when you're eating donuts.

Anyways, I've expressed my love for donuts once before and I'm here to do it again. I'm obsessed with donuts!! Fried dough with a sweet coating of some sort from glaze, to chocolate, to maple to plain ol' sugar, these things are damn good.


This recipe and I go way back. I was in the seventh grade when we were offered an opportunity for extra credit by making bread of some sort from our culture. I can't quite remember what bread had to do in our lesson plan but all I remember was we had to make cultural bread. When I got home that day, I told my parents about the project and they had no clue what to do because they aren't bakers. In fact, I can't remember them baking anything, ever!

What I can say is that filipinos love to fry. Let's be honest here, everything is better when it's fried and so filipinos know some good food. I remember coming to the conclusion to just make donuts because it would be relatively easy and well, it's fried, my parent's expertise.


Let me tell you, these were the days of dial-up internet and I remember it taking forever to find a recipe but I got one from Tyler Florence who was my favorite TV-Chef back in the day. Now remember, this was supposed to be a cultural bread and this cake donut recipe was far from a cultural bread of the Philippines.

After all the donuts were made, my parents just said to say that they were "Bitsu-Bitsu" which I guess is a filipino version of donuts. I mean, no one would know what they really were in my class of 12 year olds.


No one even questioned what they were and at the end of the day, everyone loved them and I got my extra credit so who cares if these aren't the true filipino Bitsu-Bitsu. They can't take away my extra credit anymore! 


AJ's Secret:
  • The directions indicate to refrigerate and roll out the dough. However, I've never seen cake donuts rolled and cut like yeast based donuts. Donut shops always have those cool contraptions that plunges dough into the fryer in the shape of a donut. Thus, I simply used a 1-ounce ice cream scoop, scooped out the dough and dropped the dough into the fryer. I fried it for about 5 minutes, or until the inside is cooked.

Cake Donuts
Recipe by Tyler Florence

Ingredients
3 1/2 cups (1 pound) cake flour
3 teaspoons baking powder
1 teaspoon baking soda
1 teaspoon salt
1/2 teaspoon cinnamon
2 eggs, room temperature
1 cup sugar
3 tablespoons unsalted butter, melted
1 cup milk, room temperature
1 teaspoon vanilla extract
Fat for frying, such as canola oil
*Variation: for chocolate donuts, melt 3 ounces of unsweetened chocolate along with the butter and continue as directed.

Directions
Sift together the flour, baking powder, baking soda, salt and cinnamon in a large bowl. In the bowl of an electric mixer fitted with a paddle, beat the eggs until foamy, gradually add the sugar and continue to beat until thick and yellow. Melt butter in a saucepan over low heat and combine with milk and vanilla extract. Stir the milk mixture into the egg mixture until blended. Add the dry ingredients to the wet ingredients and mix just until incorporated. Chill for 30 minutes to make it easier to roll and cut.

***See my secrets above!
Roll or pat the dough out on a heavily floured surface to about 1/4-inch thick, the dough is somewhat wet. Cut with a floured doughnut cutter, saving the holes. Transfer to a sheet of waxed paper and allow to air dry for 10 minutes. The dough will form a slight crust and absorb less fat when fried. 

Heat 3-inches of vegetable oil or shortening to 375 degrees F in an electric fryer or deep saucepan. Fry doughnuts until golden, about 5 minutes each side. To keep the oil temperature constant, fry 3 at a time. Fry the holes separately and drain on paper towels.

-Aaron John

Saturday, January 11, 2014

Peanut Butter Cookies w/ Dark Chocolate


Peanut butter is something people are obsessed with. Watching commercials of people taking a spoon to peanut butter and eating it...well I think that's interesting. While other people would bring peanut butter and jelly sandwiches to school during my elementary days, I would bring bologna sandwiches. If the day came when I had a peanut butter and jelly sandwich, I would go heavy on the jelly and light on the peanut butter. Am I weird?


Other than the rare times I would eat a peanut butter and jelly sandwich, or should I say a jelly sandwich with some peanut butter, the only time I would eat a sandwich with peanut butter alone was on a toasted filipino roll called Pan de Sal. For some reason or another, this appealed to me because of the warm crunchy bread that heated the peanut butter just enough to change it's flavor characteristics and consistency.


Well, this time it's all about a Peanut Butter cookie. These cookies are extremely moist and chewy with just a hint of chocolate to bring you to those peanut butter cup flavor characteristics. My friend C thought they were "So goooddd" and would like "a thousand more". If that's any indication to make these, do it!


AJ's Secret:
  • Why is it that my cookies come out flat instead of thick? It's all about the leavener. Baking soda causes a chemical reaction that causes the cookie to rise nicely, but once cooled, brings the cookie back down to a flatter level.


Peanut Butter Cookies w/ Dark Chocolate
Recipe from the Hummingbird Bakery Cookbook) 

Ingredients
225g unsalted butter at room temp
200g caster sugar
200g soft light brown sugar
2 eggs
1/2 teaspoon vanilla extract
240g crunchy peanut butter
340g plain flour
2 1/2 teaspoons bicarbonate of soda
1/2 teaspoon salt
75g dark chocolate, chopped

Directions
Preheat the oven to 170C (325F). Prepare two baking trays with baking parchment paper on.

 Put the butter and sugars in a freestanding electric mixer with a paddle attachment and cream until light and fluffy. Add the eggs one at a time, mixing well and scraping any unmixed ingredients from the side of the bowl with a rubber spatula after each addition. Turn the mixer down to a slow speed and beat in the vanilla extract and peanut butter. Add the flour, bicarbonate of soda and salt and mix well until a smooth dough is formed. Stir in the chocolate until evenly dispensed.

Arrange 6 equal amounts of cookie dough on each prepared baking tray. Make sure that the cookies are spaced apart to allow for spreading while baking. Bake in the preheated oven for about 10 minutes or until golden brown around the edges and quite flat. Leave the cookies to cool slightly on the trays before turning out onto a wire cooling rack to cool completely. The cookies should be soft and chewy.

-Aaron John

Saturday, January 4, 2014

Chocolate Biscotti w/ Almonds


A couple days ago, I had a recipe testing kind of day. Now, recipe testing is what I live for. It gives me a chance to axe the bad recipes and praise the good ones. This time was no different and it involved Chocolate Biscotti. But how do you know what recipes to choose? Well, this post will be all about my secrets to testing recipes and finding great ones. These are my secrets:


Where do I start? Find recipes from trustworthy people and those who you've had much success with in their recipes. A few of my favorites are Ina Garten, Michael Symon and Anne Burrell. When a majority of their recipes are in good standing, you're pretty much guaranteed a good recipe. But, don't put all your hopes in that.

What if my favorite person doesn't have a recipe for what I want to make? Go to Google and search _______ recipe. But specifically, look at the images of the final product. If something doesn't look like you would eat it, skip on it. Yes, some recipes may be BADASS but look really bad, but, what I look for is a "WOW!" moment that makes you want to eat it.


So, you've found something either from your favorite chef or a great looking photo but how do you know if you should try it out? 
Read the reviews! If a majority of the reviews are great, you probably should try it out. If not, pass on it. If it's from a food blog, read the comments. Sometimes you find great info either from the blogger or readers with their tips on the recipe.

Should I go ahead and try the recipe? Well, it's all about a gut feeling at this point. Sometimes you just feel that a recipe will be good and if you have that feeling, go for it! You never know until you try.

Should I try the whole recipe? NEVER!! This is called "Recipe Testing" for a reason! Never make the whole recipe because you don't know what the outcome will be! If it's bad, you'll be throwing away so many ingredients. If it's good, you can always make more. I try to half the recipe usually.


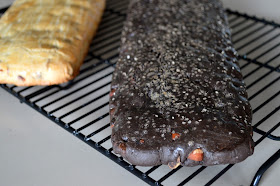
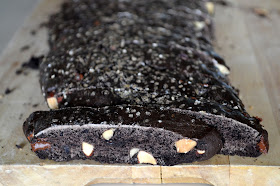
I pretty much used all these secrets when looking for this Chocolate Biscotti and ended up with one from David Lebovitz. I was drawn to this recipe by the google image search. In addition, after finding David Lebovitz, I knew I had someone trustworthy because I used a recipe of his from the past. From my research, this is an authentic Italian Biscotti because the only fat that comes into this recipe is from the cocoa powder and the egg yolks in the eggs. "Americanized Biscotti" on the other hand has the addition butter. 

After trying this recipe, I'm back to square one on the search for a Chocolate Biscotti. I was not a fan of this biscotti due to how rock hard the biscotti came out to be. My issue was that I felt that they were going to break my teeth. These are definitely cookies that you eat with coffee to soften the cookie so if you like that, be my guest. 

I, myself, prefer the Americanized version because I find butter makes a biscotti that has the right amount of crunch without the struggle of biting through the cookie. So, on to a search for a recipe with butter!

Lastly, I leave you with this. Recipe testing is not always perfect and it takes a couple of tries to find the perfect one. Don't be discouraged when something doesn't come out the way you want it. Just "Keep Calm and Cook On!"


Chocolate Biscotti
Recipe by David Lebovitz

Ingredients
2 cups (280g) flour
3/4 cups (75g) top-quality cocoa powder
1 teaspoon baking soda
1/4 teaspoon salt
3 large eggs, at room temperature
1 cup (200g) sugar
1 teaspoon vanilla extract
1/2 teaspoon almond extract
1 cup (125g) almonds, toasted and very coarsely-chopped
3/4 cups (120g) chocolate chips

For the glaze
1 large egg
2 tablespoons coarse or crystal sugar

Directions
Preheat the oven to 350F (180C) degrees.

In a small bowl, sift together the flour, cocoa powder, baking soda, and salt.

In a large bowl, beat together the 3 eggs, sugar, and vanilla & almond extracts. Gradually stir in the dry ingredients, then mix in the nuts and the chocolate chips until the dough holds together. Line a baking sheet with parchment paper or a silicone mat. Divide the dough in half. On a lightly floured surface, roll the dough into two logs the length of the baking sheet. Transfer the logs onto the baking sheet, evenly spaced apart. Gently flatten the tops of the logs. Beat the remaining egg and brush the tops of the logs liberally with the egg. (You won’t use it all). Sprinkle the tops with the coarse or crystal sugar. Bake for 25 minutes, until the dough feels firm to the touch.

Remove the cookie dough from the oven and cool 15 minutes. On a cutting board, use a serrated bread knife to diagonally cut the cookies into 1/2-inches slices. Lay the cookies cut side down on baking sheets and return to the oven for 20 to 30 minutes, turning the baking sheet midway during baking, until the cookies feel mostly firm. Once baked, cool the cookies completely then store in an airtight container for up to two weeks. If you wish, the cookies can be half-dipped in melted chocolate, then cooled until the chocolate hardens.

-Aaron John