Sunday, December 30, 2012

My Top 10 Posts of 2012

Looks like this year is just about over. Because 2012 is almost over, I find it fitting to do a year in review of my top 10 favorite posts of 2012. Let's get it started.


Number 10: Spinach dip - It's creamy, cheesy, a little spicy and with the spinach it has to be just a little bit healthy, right?


Number 9: Pineapple Upside Down Cake - I've tried many Pineapple Upside Down Cake recipes before and this one by Eva Longoria is by far the best one.


Number 8: Ginger Molasses Cookies - I ended this year with this cookie and this has just the right amount of spice, is crisp and chewy.


Number 7: Turon (Filipino Banana Lumpia/Eggroll) - My filipino post of the year. This is by far my favorite Filipino dessert.


Number 6: Chocolate Mocha Cake - Moist chocolate cake with a creamy coffee flavored frosting. Delish! 


Number 5: Chocolate Raspberry Cake w/ Vanilla Bean Buttercream - Chocolate and Raspberry. How can you go wrong with those flavors?


Number 4: Chicken Katsu - By far one of the easiest chicken dishes to make. It's simply breaded fried chicken breast with sauce. I think that's all I have to say here.


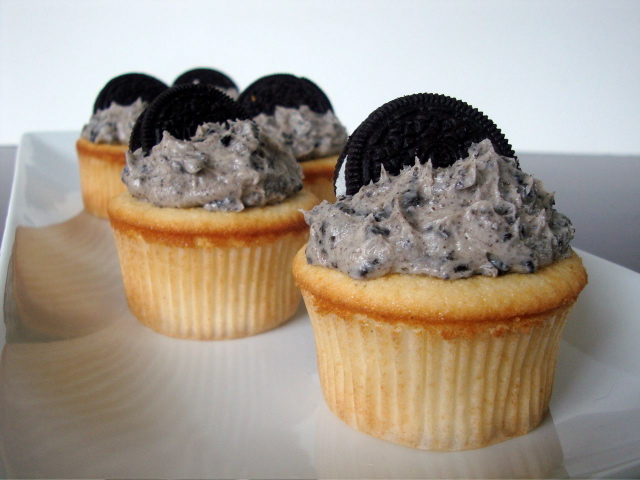
Number 3: Oreo Cupcakes - These cupcakes were the first recipe I posted as a Foodie 100 member. Using a boxed cake mix makes this easy and makes the Oreo Frosting the star.


Number 2: Orange Chicken - I love my "Americanized" Chinese food and Orange Chicken is one of them. Crisp chicken in a sweet and spicy orange sauce.


Number 1: Sour Cream Coffee Cake - This Sour Cream Coffee Cake not only got the most views this year but was one of my favorites due to it's moistness and crunchiness from the crumb topping.

So that was my 2012. What was your favorite post from this year? 

Let's hope 2013 will be just as good and just as delicious. Don't be shy and stop on by next year!

-Aaron John

Wednesday, December 19, 2012

Ginger Molasses Cookies


Growing up, I wasn't one to eat these "spice" type cookies. It wasn't until I was in my art class way back in elementary school that I had my first gingersnap from our art teacher. Now, I thought the flavor was amazing but that art teacher, who was probably in her 20's and left the year after, gave us some STALE ASS cookies. Oh heck no!


I don't know, maybe it was the fact that that teacher gave us some stale cookies. Maybe it was the fact that my mom didn't like them. Maybe it was the fact that I didn't want to get them from the store in those big packages with 437824 cookies in them and knowing that I will be the only one eating them. Whatever the reason, rarely did I eat them.


Then last year, I tackled Speculoos right after trying "Cookie Butter" at my friend's house which was amazing. But this year, it's a whole other spice cookie. This year, I tackle that stale ass gingersnap from my younger years and make a Ginger Molasses Cookie.


This cookie makes up for that stale gingersnap by 10X. I reduced the amount of cloves by half because I personally find cloves to be overpowering but they still had great clove flavor. These cookies have just the right amount of spice, are crisp on the outside, have a nice crunch from the sugar (if you use raw sugar to roll them in) and they have this soft and chewy center to them if you bake them for a shorter amount of time.

So here's my lesson. If someone passes off a stale ass gingersnap to you, throw it back in their face. Well...maybe just throw it in the trash and make these cookies when you get home instead.

Ginger Molasses Cookies
Recipe from 17 and Baking

Ingredients
2 cups all purpose flour
2 tsp baking soda
2 tsp ground cinnamon
2 tsp ground ginger
1 tsp ground cloves (I used 1/2 tsp ground cloves)
Pinch of salt
1 cup packed light brown sugar
1/4 cup molasses
3/4 cup canola oil
1 large egg
Sugar for rolling (I used raw sugar)

Directions
Whisk together the flour, baking soda, spices, and salt in a medium bowl. In another bowl, combine together the brown sugar, molasses, canola oil, and egg until smooth. Mix the flour mixture into the brown mixture, stirring until dough comes together. Cover with plastic wrap and chill for 20 minutes.

Preheat the oven to 350 degrees and line baking sheets with parchment paper. Scoop up the dough using a 1-ounce scoop. Roll the balls in sugar and place on the baking sheets 2 inches apart. Bake for 8 to 10 minutes. I baked mine for 9 minutes. Bake it longer for crisper cookies

Cookies will be very soft but will firm up. Leave on the baking sheet 5 minutes, then transfer to a wire rack to cool completely.

-Aaron John

Wednesday, December 12, 2012

Chocolate Crinkles


Eleven weeks, seventeen quizzes, four midterms, three speeches and one final later, I can officially say that Fall Quarter 2012 is officially done and over with. No more early mornings, no more studying and no more stressing, well until Winter Quarter starts up. But until then, it's time to finally start baking again!


Now, I have to say, I bookmarked this recipe for Chocolate Crinkles back in September and this was the first thing I vowed I would make on the first day of break. Well, the first day of break had arrived and here goes! I love how unique each and every cookie comes out. Dare I say, just like snow flakes? Ha!


If you love chocolate, Chocolate Crinkles are for you! Not only are these chocolaty, (btw did you know "chocolaty" is actually word? I had no clue either!), but these cookies combine the best of both worlds, or three worlds in this case. These Chocolate Crinkles have the shape of a cookie, have a somewhat caky quality to them and have this brownie effect by being almost fudgy. Just make sure not to over-bake them! For a Holiday cookie giveaway, this is a great addition to any list!

Chocolate Crinkles
Recipe from Simply Recipes

Ingredients
1 cup unsweetened cocoa powder
1 1/2 cups white sugar
1/2 cup vegetable oil
4 eggs
2 teaspoons vanilla extract
2 cups all-purpose flour
2 teaspoons baking powder
1 teaspoon espresso powder (optional)
1/2 teaspoon salt
1 cup confectioners’ sugar

Directions
In the bowl of an electric mixer fitted with the paddle attachment (though you can do this with a wooden spoon, too) beat together the cocoa powder, white sugar, and vegetable oil until it comes together into a shiny, gritty, black dough of sorts.

Add the eggs, one at a time, mixing for 30 seconds each. Add the vanilla and beat in thoroughly.

In a separate bowl, whisk together the flour, baking powder, salt, and espresso powder if using. Mix into the chocolate mixture on low speed until just combined. Do not overbeat. Cover the dough with plastic wrap and chill the dough for four hours or overnight.

Preheat the oven to 350°F and line two baking sheets with parchment paper. Place the confectioner's sugar in a wide bowl. Using a tablespoon, get clumps of the chilled dough and roll them into 1-inch (2.5 cm) sized balls using your hands. Roll the balls in the confectioner's sugar and place on the cookie sheets (you should be able to get 12-16 on each sheet). Bake for 10-12 minutes. Allow to cool a minute or two on the sheets before transferring to a wire rack to cool completely.

-Aaron John

Sunday, November 25, 2012

Southern Italian Ratatouille


Can it really be? Has AJ really posted something new?! I know, I know. It's been almost a century, or so it may seem, since I dusted off my old blog and actually put out a blog post. Well here's one to finally post about. I tell you, being a full time student, working part time and the endless amount of work I have to get done, it's almost becoming impossible to blog on a weekly basis as I have before. Though my blog post will become sparse over this school year, I'll do my best to post as often as I can.


First of all, I hope everyone had a great Thanksgiving. I hope it was full of the three F's, friends, family and food. My Thanksgiving was mellow and consisted of me cooking the whole meal! Most things I cooked, I blogged about once before such as Prime Rib and Roasted Garlic and Rosemary Focaccia, but this year, I added a new vegetable dish that embodies fall flavors, a Southern Italian Ratatouille by Michael Chiarello.


This dish is something really earthy. It's somewhat tangy from the tomatoes, the veggies still have a nice crispness to it and the flavor of thyme and basil run through the whole dish. Definitely delicious and worked wonderfully with the Thanksgiving meal. Just make sure you thoroughly brown the veggies. In the word of Anne Burrell "Brown food tastes good". Otherwise, you'll just have steamed vegetables, and we can all agree, that's just blehhhh.

Souther Italian Ratatouille
Recipe by Michael Chiarello

Ingredients
5 tablespoons extra-virgin olive oil
1 1/2 cups thinly sliced fresh wild or domestic mushrooms
Gray salt
Freshly ground black pepper
1 onion, diced
1 tablespoon plus 1 teaspoon minced garlic
1/2 pound yellow squash, cut into 1/4-inch dice, about 1 1/2 cups
1/4 cup diced red bell pepper, cut into 1/4-inch dice
3 tablespoons finely chopped fresh thyme leaves
1/2 pound zucchini, cut into 1/4-inch dice, about 1 1/2 cups
1/2 cup thinly sliced leek, white part only
3/4 cup peeled, seeded, and chopped vine-ripened tomatoes, about 1/2 pounds
1 cup loosely packed baby spinach, sliced
2 tablespoons coarsely chopped fresh basil leaves
1/4 cup freshly grated Parmesan

Directions
Heat 2 tablespoons of the olive oil in a large skillet over medium-high heat until hot. Add the mushrooms and cook, without moving them, until brown on 1 side, about 1 minute. Continue to saute for another 1 to 2 minutes. Season mushrooms with salt and pepper and pour onto cookie sheet to cool. Set used pan aside.

 In a separate, clean skillet, heat 1 tablespoon oil over medium heat. Add minced garlic. Cook until golden brown, about 1 to 2 minutes. Add onion and cook until softened, about 5 minutes. In the pan where the mushrooms were, add 2 tablespoons olive oil over medium heat. Add yellow squash. Cook until browned, about 1 to 2 minutes and drain onto same cookie sheet with mushrooms.

 Place peppers in hot pan where squash was cooking, sprinkle with 2 tablespoons of thyme. When heated thoroughly, add peppers to waiting mushrooms and yellow squash. Add zucchini to the same pan, add remaining thyme, cook until browned, about 2 minutes. Pull both pans (onions and zucchini) off the heat, and add to cookie sheet with other vegetables.

 In the former zucchini/mushroom pan, cook leeks to soften, about 2 minutes. In the other, bring the tomatoes to a simmer. Season the leeks with salt and pepper, to taste, and add spinach. When spinach is wilted, add cooked leeks to cooling vegetables on cookie sheet. Add basil to the tomatoes, then add tomatoes to cookie sheet. Stir gently, and top with Parmesan and serve.

-Aaron John

Saturday, October 6, 2012

Instagram Quickie: Lemon Marinated Grilled Salmon


Life has been busy. With work, juggling classes and even applying for another major on top of my Biochemistry major and Diversity minor, it has been pretty hectic. Not to mention, it's only been two weeks since the start of the new school year!

On top the start of the new school year, this Seattle weather has been a big tease. Freezing cold temperatures in the morning and Summer temperatures in the afternoon? Who would have thought. It's the only time where Winter drinks like Hot Cocoa meet in the morning and Summer Foods like Grilled Salmon meet in the afternoon. I guess Summer just wants to stick around that much longer.

Lemon Marinated Grilled Salmon
Recipe by Me

Ingredients
1 lemon, juiced
1/4 cup olive oil
1/4 tsp salt
1/4 tsp pepper
1/4 tsp garlic powder
4 to 5 (5-ounce) Salmon fillets
Additional lemon to squeeze over the cooked Salmon

Directions
Preheat the grill to medium

Whisk the marinade together by combining the lemon juice, olive oil, salt, pepper and garlic powder until homogenous. Place the salmon fillets in a dish and pour the marinade over the salmon and  flip them over a few times to ensure the marinade is completely coating the fish. Set aside for about 15 to 20 minutes.

Remove the Salmon from the marinade and season both sides with salt and pepper. Brush and oil the grill. Place the salmon onto the grill and let it cook for about 4 minutes for a crust to develop and those famous grill marks can form. Using a spatula, flip the salmon over and cook for about 3 to 4 minutes longer. The salmon will go from a translucent color to more opaque as it cooks. If the grill flares up, move the salmon to a cooler part of the grill. 

Remove the salmon from the grill and onto a platter. Immediately squeeze more lemon juice over the top.

-Aaron John

LinkWithin

Related Posts with Thumbnails