Saturday, April 30, 2011

Mamon Tostado


The time has come, I have finally run out of butter! How can I make sweet treats without having that oh so delicious butter? Can't make cake, can't make frosting. Can't make cookies, can't make brownies. Can't make biscuits, can't make scones. Can't make pie crust, can't make...anything really. Essentially, the whole dessert world revolves around butter!

What I did know was I wanted to make cake because I just had that "craving". However, like I said, how can I make cake without butter? Immediately Sponge Cake crossed my mind. Sponge cake has a more richer flavor than Angel Food Cake while still retaining that light and fluffy texture while some use oil instead of butter. During class yesterday, all I could think about was making this cake. I couldn't even focus on the lecture on "Spectroscopy and Alcohol Synthesis". I kept saying to myself I wanted to make this sponge cake, layer it with raspberry or strawberry jam, perhaps some pieces of strawberries while being filled and frosted with whipped cream. Yum! Screams summer right?

As I made the Sponge Cake, everything was turing out incredible. The sponge cake was fluffy and  golden brown. I was grinning from ear to ear. Now time to make the whipped cream frosting. As I opened the refrigerator door, I reached out for the heavy cream container only to find 1/4 cup of cream was left. NOOOOOOOOO!!! Now what am I supposed to make with this cake??


The Sponge Cake

I thought back to my roots. Filipinos have this sort of cake/cookie called a Mamon Tostado which is essentially toasted pieces of Sponge Cake. It's a Filipino Biscotti, if you will. It's crunchy and slightly sweet. Perfect for dipping into coffee. So if you made a sponge cake and find out that you have run out of ingredients for a frosting, make Mamon Tostado.


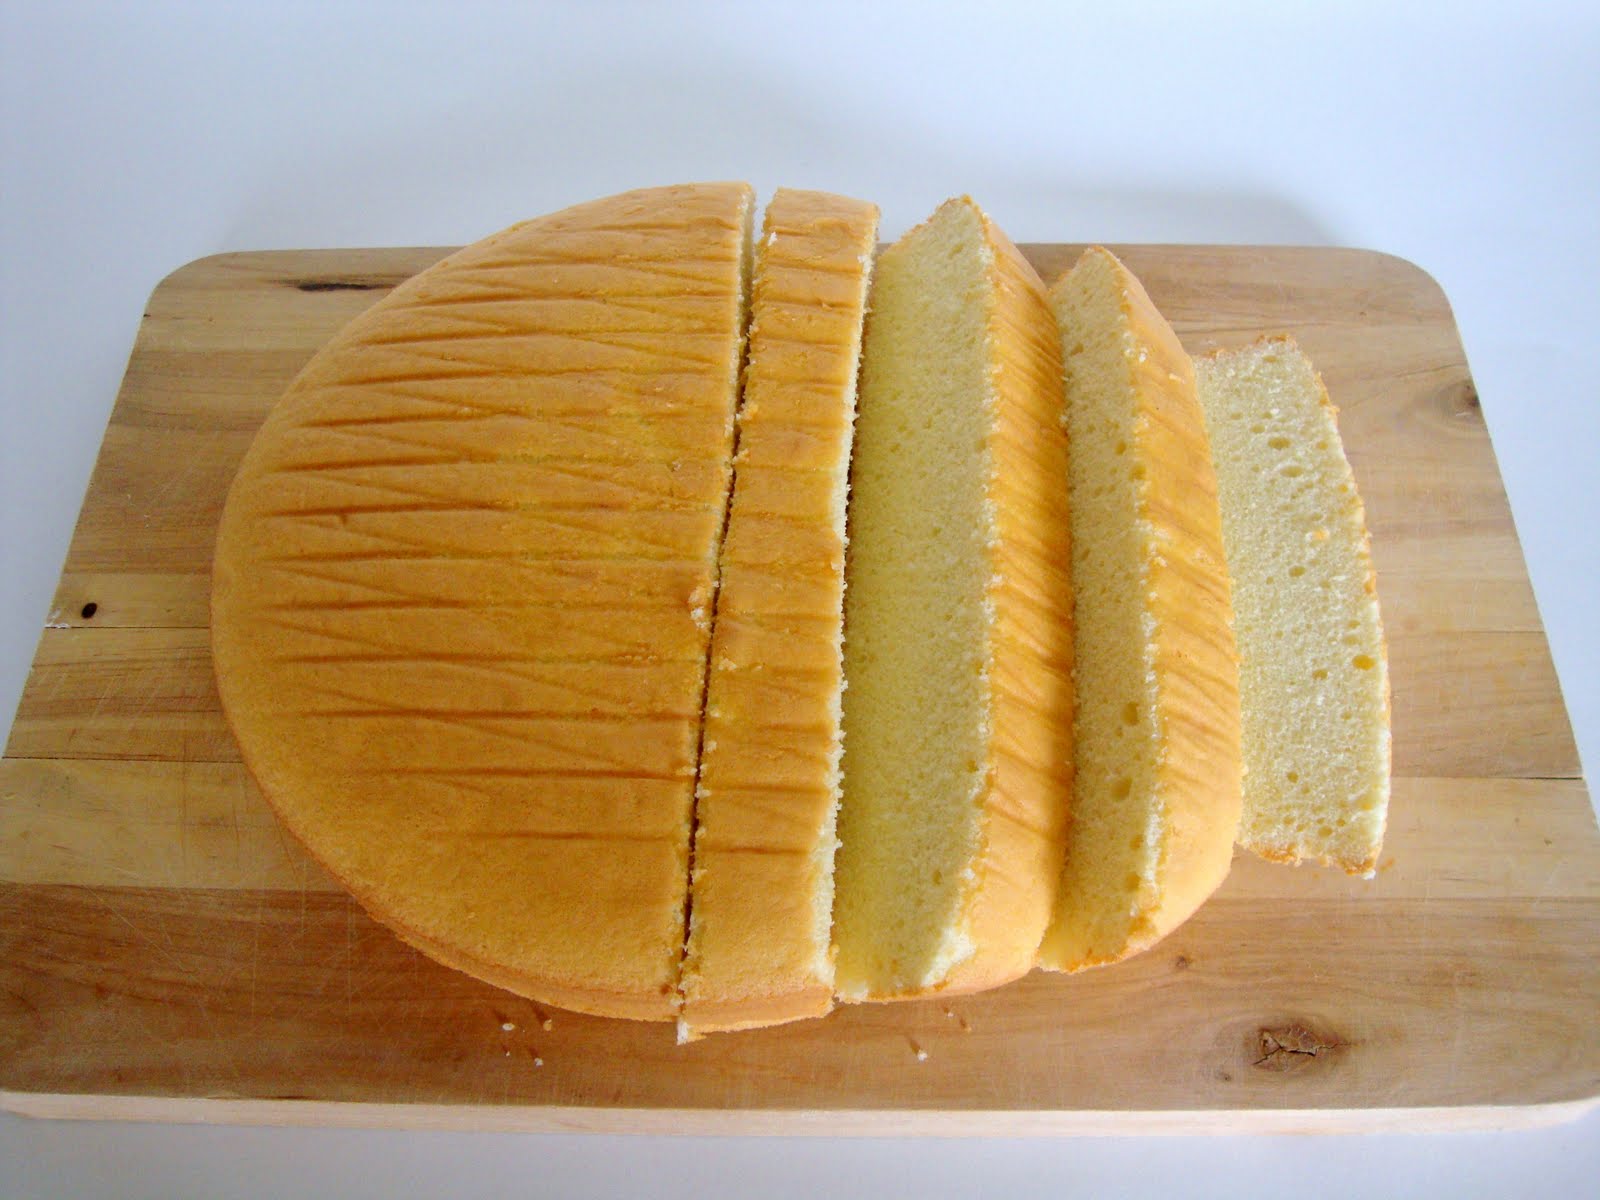
Slice into rectangles and toast

Tips
-Use room temperature egg whites when making the sponge cake. It makes whipping a lot quicker

-I toasted the Mamon Tostado for only 20 min. However, they were not completely crunchy. Toast it for an additional 20 min until it is completely crunchy all the way through

Results
Taste: Slightly sweet cake with an "egg-y" taste

Texture: Soft and light yet sturdy for a "whipped egg" cake. Toasting makes it crunchy. 

Japanese Sponge Cake (Makes one 7 or 8-inch layered cake)
Recipe from La Fuji Mama

Ingredients
For Noriko’s sponge cake:
4 large eggs, white and yolks separated
4.2 ounces (120 grams, 9.5 tablespoons) granulated sugar, sifted once
3 tablespoons milk, at room temperature
1/2 teaspoon vanilla extract
4.2 ounces (120 grams, 14 tablespoons) cake flour, sifted 3 times
1.2 ounces (22 grams, 2.3 tablespoons) butter, melted (I used canola oil)

Directions
To make Noriko’s Sponge Cake:

1. Preheat the oven to 350 degrees Fahrenheit (170 to 180 degrees Celsius). Line a 7 (18cm) or 8-inch circular cake pan with parchment paper, or grease the cake pan with butter, then lightly coat the pan with flour.

2. Add the sugar to the egg whites, and beat the egg whites until they are stiff and glossy.

3. Add the egg yolks to the egg white mixture, and gently whisk until the yolks are incorporated.

4. Add the milk, vanilla extract, and flour (in that order) to the batter and gently fold them into the batter with a spatula. Fold in the melted butter until it is well combined.

5. Pour the cake batter into the prepared cake pan, and get rid of any air bubbles in the batter by dropping the pan on a counter once or twice. Bake the cake for 25 to 30 minutes. The cake is done when it is golden brown and springs back when pressed lightly. Let the cake cool completely on a wire rack. Run a blade around the inside of the pan to loosen the cake, and remove.

Mamon Tostado
Directions


1. Preheat oven to 300 degrees F

2. With a serrated knife, cut the sponge cake into 1 inch wide slices. From there, cut each slice to about 2.5 inches in length and 1 inch thick. To sum it up, each Mamon Tostado should be 1 inch x 1 inch x 2.5 inches.

3. Arrange the slices onto a baking sheet and bake for 40 min, giving each Mamon Tostado a quarter turn every 10 min.

-Aaron John

Saturday, April 23, 2011

Brownies Part Trois, Outrageous Brownies Part Deux


This week, the sun in Seattle finally made its appearance. Oh, but just as the sun came out, the "interesting" people came out as well. These "interesting" people were the most, hmmm, I think I better describe them. One of them was a woman dressed up in cat ears and whiskers with a sort of forest-y outfit. Another 2 people were dressed up in purple spandex from head to toe. Literally, spandex covering the face. ha. Another person was wearing a ninja type mortal combat outfit. I thought Halloween was over months ago? But to top it all off, I was called a "yellow monkey" by an elderly russian who then preceded to shove me from my backpack. Rude, much? I'm telling you, all the "crazies" are coming out with the sun!

Another thing that's crazy is why I've had a whole string of brownie/cookie type recipes for the past 2 weeks. Keeping that in mind, I was reminded of my hunt for a perfect brownie recipe that was still on-going. I was looking for brownie recipes and I just had this urge to bake Ina Garten's Outrageous a second time to see if things will be different.

As I was making the batter I was getting pretty happy at the way things were going. The batter was beginning to look and taste a whole lot different than the first time. Oh man, was my hopes in these brownies being built up or what? I put these in an 8x8 pan, since I made 1/4 of the recipe, placed them in the oven and crossed my fingers. Are these THE BROWNIE RECIPE? The taste was there, but the texture, not so much...

Tips
-I made 1/4 of the recipe since this was another "testing out" of the recipe
-I used 1/2 tsp of Instant Espresso powder for 1/4 of the recipe which makes it out to be 2 tsp for the whole recipe

Results
Taste: Intensely chocolately! Strong, rich flavor from the chocolate, a bit on the sweet side but not overpoweringly sweet with slight hints of coffee flavor.

Texture: Not exactly the texture I want in a brownie. These tended to fall apart and not hold its shape so much when eating probably due to the low amount of flour. While reading other brownie recipes, they had about double the amount of  flour compared to this recipe. I would try increasing the flour by 1/2  to 3/4 cup maybe and see how that goes.

Outrageous Brownies
Recipe by Ina Garten

Ingredients
1 pound unsalted butter
1 pound plus 12 ounces semisweet chocolate chips
6 ounces unsweetened chocolate
6 extra-large eggs
3 tablespoons instant coffee granules (I would change this to 2 tsp Instant Espresso Powder)
2 tablespoons pure vanilla extract
2 1/4 cups sugar
1 1/4 cups all-purpose flour
1 tablespoon baking powder
1 teaspoon salt
3 cups chopped walnuts

Directions
Preheat oven to 350 degrees F.

Butter and flour a 12 x 18 x 1-inch baking sheet.

Melt together the butter, 1 pound of chocolate chips, and the unsweetened chocolate in a medium bowl over simmering water. Allow to cool slightly. In a large bowl, stir (do not beat) together the eggs, coffee granules, vanilla, and sugar. Stir the warm chocolate mixture into the egg mixture and allow to cool to room temperature.

In a medium bowl, sift together 1 cup of flour, the baking powder, and salt. Add to the cooled chocolate mixture. Toss the walnuts and 12 ounces of chocolate chips in a medium bowl with 1/4 cup of flour, then add them to the chocolate batter. Pour into the baking sheet.

Bake for 20 minutes, then rap the baking sheet against the oven shelf to force the air to escape from between the pan and the brownie dough. Bake for about 15 minutes, until a toothpick comes out clean. Do not overbake! Allow to cool thoroughly, refrigerate, and cut into 20 large squares.

-Aaron John

Saturday, April 16, 2011

Chocolate Chip Macadamia Nut Blondies


Has anyone been keeping up with American Idol this year? Well, a couple weeks ago I renounced my "viewership" towards the TV show. There's just something about the show that's not the same ever since Simon Cowell left. Simon Cowell spoke the truth. If he didn't like a singers performance, a majority of America didn't like as well simply because he was right.

This season of American Idol, I like to call it the "Season of Kindness". Without even watching the show anymore, I can tell you that all the judges will think that the contestants are phenomenal. Every episode I saw was the judges praising each and everyone of the contestants. Do I think they're phenomenal? Yeah...Not really. Without Simon Cowell, the show is not the same and will never be the same. 

This leads to todays treat, Chocolate Chip Macadamia Nut Blondies. These are supposed to be a mixture of a cookie and brownie all in one. Just like American Idol, these blondies are not the same as a chocolate chip cookie or brownie. Ha.

Tips
-I saw recipes in which you melt the butter and sugar together instead of creaming. This may lead to a chewier blondie

Results
Taste: Tasted like a chocolate chip cookie but not exactly. It seemed to lack a depth of flavor that a chocolate chip cookie has.

Texture: Not chewy like a cookie or brownie. The edges were chewy but you only get so many edges in a 9x13 pan. More cakey than anything

Brewer's Blondies
Ingredients
2 1/3 cups all-purpose flour
1 1/2 teaspoons baking powder
1 teaspoon salt
2 tablespoons malted milk powder (I omitted this)
14 tablespoons unsalted butter, softened, cut into 1-inch cubes
1 3/4 cups firmly packed dark brown sugar
2 large eggs
2 teaspoons pure vanilla extract
3/4 cup malted milk balls (like Whoppers or Maltesers), coarsely chopped in a food processor (Omitted)
3/4 cup semisweet chocolate chips  (I used 1 cup milk chocolate chips)
3/4 cup toasted walnuts, chopped (I used 1 cup macadamia nuts)

Directions
Preheat the oven to 350 degrees F. Butter the bottom and sides of a 9-by-13-inch baking pan.
In a medium bowl, whisk the flour, baking powder, salt and malted milk powder together.

In the bowl of an electric mixer fitted with the paddle attachment, beat the butter and brown sugar on medium speed until completely combined. Scrape down the bowl, add the eggs and vanilla, and beat until combined.

Add the flour mixture in two batches until just combined. Add the malted milk balls, chocolate chips and walnuts and beat until just combined, about 10 seconds. The mixture will be thick. Turn the mixture out into the prepared pan and use an offset spatula to spread it evenly.

Bake in the center of the oven for 25 to 30 minutes, or until a toothpick inserted into the center of the blondie comes out clean.

Transfer to a wire rack and let cool for 20 minutes.

-Aaron John

Saturday, April 9, 2011

Espresso "Brookies"


Have you ever craved some sort of food but can't exactly pinpoint what food you actually want to eat? Well, that happens to me often. Sometimes, I have to eat everything to know exactly what I actually wanted. However, there comes times when I eat everything in sight and still have that craving. I'm not the only one who does this right? Once you start your search, you can't exactly stop. That's correct for me anyways...

So, after a long week of school, I developed this craving for something but didn't know what. I ate crackers, chips, pretzels, chocolates and ice cream. Still no luck. Will these "Espresso Brookies" satisfy my craving?

Tips
-I found that when I didn't chill the dough, the cookies had a nice shine to them like a brownie. 

Results
Taste: The tastes of chocolate and espresso come together wonderfully. Each flavor enhances the other and makes for one darn good cookie! The chocolate and espresso flavors are intense!

Texture: Not chewy like a brownie. More cake like in texture with the edges only slighty chewy. 


Espresso "Brookies"
Recipe from Handle The Heat
Makes around 3 dozen cookies

Ingredients
2⅔ cups (around 16 oz.) bittersweet chocolate, chopped
4 tablespoons of butter, softened
4 eggs
1⅓ cups of granulated sugar
1 teaspoon vanilla extract
½ cup of all-purpose flour
½ teaspoon baking powder
1 tablespoon instant espresso powder

Directions
Preheat over to 350°. Line two baking sheets with parchment paper.

Melt chocolate and butter in a double boiler, stirring occasionally, until a smooth mixture forms. Alternatively, melt in a heat-proof bowl in the microwave in short 15-20 second bursts until melted, stirring after each burst. While chocolate and butter are melting, combine eggs, vanilla, and sugar in a large bowl and set aside.

Sift together flour, baking powder, and espresso. Whisk chocolate and butter into the egg mixture until well combined. Gradually stir in flour, baking powder, and espresso until a smooth batter forms. Chill batter in the fridge for an hour, or until firm.

Drop tablespoons of batter onto prepared baking sheets, spacing at least 2 inches apart. Bake for 8–10 minutes, until crackled and firm on the outside. Don't overbake!

-Aaron John

Saturday, April 2, 2011

Zebra Cake


If you're a reality show junkie like me, you would have known that Top Chef All Stars (one of my favorite shows) had finished up its season this past Wednesday. Glad to say, my top favorite since the very beginning of the season, Richard Blais, won!! He's extremely creative as a chef. Who would have thought liquid nitrogen had so many uses in the foodie world? Oh man, do I aspire to be like him. He's just so cool!! ha.

Now, it's my turn to be creative. Cake is well....cake. Sometime's they all look the same no matter what flavor it is. You slice it and it's one color. But oh, is this cake different. With the colors of a chocolate and vanilla cake, it takes cake to a whole new level. It's more sophisticated that a marbled cake and extremely innovative. Not to mention, it's just so creative!

Tips
-Instead of scooping 3 tablespoons of batter each and every time for the layers, I decided to use my 1/4 cup measuring cup to make quicker work.

-When layering the batters, don't wait for the batter to spread. Keep adding batter to the center. Look at AZ Cookbook's Pictures!

-Try to rotate the cake pan around after each addition of cake batter. I found that by doing this, you get a more uniform looking cake whereas if you don't, you'll get parts of thick layers and parts of thin layers of the cakes (which I had). Look at the last picture above. Thin layers on the bottom right whereas the top left was thicker.

-I would have liked the cake to be a tad sweeter. I would add another half cup of sugar (for a total of 1 1/2 cups) next time and see how that goes.

Results
Taste: Hints of vanilla and chocolate flavor. Has more of an egg-y flavor than something that is buttery. Not sweet at all either

Texture: Almost a mixture between a sponge cake and oil cake in texture. Not as soft as a sponge cake but softer than a regular oil or butter cake.

Zebra Cake (Makes one 9-inch (23 cm) cake)
Preparation time: 10 minutes
Cooking time: 40 minutes
Recipe via AZ Cookbook

Ingredients
4 large eggs, at room temperature
1 cup (8 oz / 250 g) granulated sugar
1 cup (8 fl oz / 250 ml) milk, at room temperature
1 cup (8 fl oz / 250 ml) oil (corn, vegetable or canola)
2 cups (10 oz / 300 g) all-purpose flour
1/3 teaspoon vanilla powder
1 tablespoon baking powder
2 tablespoons dark cocoa powder

Directions
1. Preheat the oven to 350F (180C).

2. In a large mixing bowl, combine eggs and sugar. Using a hand-held electric mixer or wire whisk beat until the mixture is creamy and light in color

3. Add milk and oil, and continue beating until well blended.

4. In a separate bowl, combine and mix flour, vanilla powder and baking powder. Gradually add the flour mixture to the wet ingredients and beat just until the batter is smooth and the dry ingredients are
thoroughly incorporated. (DO NOT OVERBEAT to prevent air pockets from forming in the batter.

5. Divide the mixture into 2 equal portions. Keep one portion plain. Add cocoa powder into another and mix well.

6. Lightly grease the pan with oil. If you don’t have non-stick baking pan, grease whatever pan you have then line it with parchment paper (baking paper).

7. The most important part is assembling the cake batter in a baking pan. This is what you do. Scoop 3 heaped tablespoons of plain batter (you can also use a ladle that would hold 3 tablespoons) into the middle of the baking pan. Then scoop 3 tablespoons of cocoa batter and pour it in the center on top of the plain batter. IMPORTANT! Do not stop and wait until the previous batter spreads - KEEP GOING! Do not spread the batter or tilt the pan to distribute the mixture. It will spread by itself and fill the pan gradually. Continue alternating the batters until you finish them.

8. Bake in the oven for about 40 minutes. Do not open the oven door at least the first 20 minutes or the cake will shrink and will not rise. To check if the cake is ready, insert a toothpick into the center. It should come out clean when ready. Remove from the oven. Immediately run a small thin knife around the inside of the pan to loosen the cake, then invert the cake onto a cooking rack. Turn the cake back over and let cool. You can sprinkle the top of the cake with some powdered (confectioner’s) sugar or leave it plain.

-Aaron John

LinkWithin

Related Posts with Thumbnails