Saturday, March 31, 2012

Spinach Quiche


There are many misconceptions out there. One of them I always hear, and heard again this week, was "Seattleites Don't Carry Umbrellas". The funny thing about this is, those that actually say and believe in this phrase are always the people who walk into class looking like a lost, wet dog. I'm sorry, but that is not a very attractive look. For the record, I always carry an umbrella. They can say I'm not a "True Seattleite" all they want but I at least I stay drier and look better than them. ha.


This leads me to this post of Spinach Quiche. They say "Real Men Don't Eat Quiche" and I say, those people who believe in this saying are missing out. It's one thing to eat it and not like it and it's a totally different thing if you have never tasted the glory that is Spinach Quiche. The flaky crust, the soft eggy center, the tanginess from the cheese and the slight al-dente quality of the spinach and the onions all make for one great combination. If Spinach Quiche is not "manly" enough for you, there are bacon and cheddar quiches out there. You have to try it at least once in your life. 


Now the big question is, where the heck do all these sayings come from? When you think about them, they make no sense! They begin to govern our lives in a way that prevents us from doing what we want to do because we fear the judgements of others. I say forget these sayings, stop using them as an explanation to your current situation and just live your life! We only have one life to live, so live it the way YOU want. And hey, if you're a Seattleite that enjoys looking like a wet dog, have at it. Can I get an Amen?! ha.

Spinach Quiche
Recipe from The Faux Martha
Ingredients
Crust
1 1/4 c. all-purpose flour
1/2 tsp. sea salt
1/2 tsp. sugar
1/2 c. (1 stick) unsalted butter, chilled and cut into small pieces
2 to 4 tbsp. ice water

Filling
3 oz. cream cheese, room temperature
1/3 c. half and half
3 large eggs
10 oz. package frozen chopped spinach, thawed and drained
1/2 c. grated cheddar
1/4 c. grated parmesan
1/2 large sweet onion, finely diced
1/4 tsp. sea salt
1/4 tsp. pepper
1 tsp. olive oil

Directions

Prepare the crust by preheating the oven to 425°.

In a large bowl, combine flour, salt, and sugar. Add butter into flour mixture. Combine with a pastry blender or fork until the mixture resembles coarse meal. (You can use a food processor for this step, however, cutting the butter in by hand lends for a flakier crust.)

Add cold water 1 tablespoon at a time, mixing with pastry fork until dough holds together without feeling wet or sticky. Gather dough into ball. Flatten into disc, and cover with plastic wrap. Transfer to refrigerator, and chill at least 1 hour or freeze for 15 minutes. (Dough can be stored, frozen, up to 1 month.)

Roll out dough to fit the size of a round, removable bottom, tart pan. Add flour to surface to keep dough from sticking. Work quickly as the dough will get warm, making it harder to handle. Flash freeze (place in freezer for 5 min) if it gets too warm. Press the dough into the tart pan.

Roll the extra dough off with a rolling pin. Fix any holes in your dough. (I use a little water and extra dough to help mend the holes.)

Add pie weights or beans to crust and bake for 10-15 minutes. (You can skip this step and bake the crust and filling at once. I prefer to bake my tart shell first. That way I can ensure my crust will be cooked all the way through.)

Prepare the filling by sauteing diced onions in olive oil with a dash of salt until translucent.

Meanwhile, beat cream cheese in medium bowl until smooth. Gradually beat in eggs and half and half. Mix in remaining ingredients. Pour egg mixture into prepared crust.

Bake until filling is set, 20–25 minutes. Cool 10 minutes before serving.

-Aaron John

Friday, March 23, 2012

Chocolate Ganache Cupcakes


Well, two years have really gone by and it's another Blog-iversary!! My blog has been up and running for two whole years and I can't believe it. Never would I have imagined that I would still be Food Blogging up to this day. 


To be honest, there have been some days/weeks where I ran out of inspiration. This year, I came to a point where I felt as if I had done everything and my time in blogging was up and boy was I wrong. There is so much more food out there for me to make that I have no reason to stop. This became a major reason in trying to include more savory food posts and blogging about different food joints I come across.


My goal for the next year? Continue adding on more savory posts to this blog. I feel for this blog to be complete, it needs more savory posts because let's face it, we can't live off sweets even as hard as we try. But, wouldn't it be great to just live off ice cream and cake? That would be such a great life. But until then, we can settle on portion control with cupcakes.

For this Blog-iversary, I made Chocolate Ganache Cupcakes. A celebration is not complete unless you have some sort of cake. A celebration is the one day where we can all toss aside your Jenny Craig diet and indulge so why not chocolate upon chocolate? 

When all is said and done, I have to thank all my readers/likers/followers. Without all of you, this blog would probably be done a long time ago. But it's people who share in the same passion for food that I find the reason to blog. So, thank you!! :) I look forward to the new food adventures I will have this year! 

Chocolate Ganache Cupcakes
Recipe for Chocolate Ganache from Projectmcb

Ingredients
Cake
Hershey's Chocolate Cake (I blogged about it here)

Ganache
8 ounces semisweet chocolate, finely chopped
3/4 cup heavy cream

Directions
Make the chocolate ganache by putting the chocolate in a medium heatproof bowl. In a small saucepan, bring cream to a boil. Pour the cream over chocolate and shake the bowl gently so cream settles around the chocolate. Set mixture aside until chocolate is soft, about 5 minutes. Whisk gently until smooth, taking care not to incorporate too many air bubbles. Stir in one of the flavorings, if desired.

Dip the tops of the cooled cupcakes into the frosting. Let cakes stand on rack until frosting is completely set.

-Aaron John

Saturday, March 17, 2012

Spinach Dip


So, it's St. Patrick's day; the day when everyone seems to post something that's green. Whether it be green drinks, green "Red Velvet Cupcakes" or topping everything with a green "somethin' somethin'" everyone seems to be doing it. Now, I'm all for things certain things being colored and I have to say I eat my fare share of Red Velvet Cupcakes, Lucky Charms and Captain Crunch Berries, but can we pick a color that is at least appetizing or choose to make something that is natural? 


I say this because I once had a bad experience with the color green. There used to be a time when Heinz Ketchup decided to make themselves colored ones, specifically green. Being about 8 years old, of course I thought it was cool and so did my brother. But let me tell you, once that blob of nastiness was placed on my plate, the "coolness" factor went straight out the window. I think the main problem isn't the color green itself. The problem is when something we become so familiar with in color and taste get changed in some way, it throws us off. 

For instance, Macarons come in a variety of colors indicating flavor. I'll eat the green one and I'll eat the blue one. Heck, I'll even eat the pink one while I'm at it but, it's the fact that these have always come in a variety of colors that it becomes normal to us. Now when we take a Red Velvet Cupcake which we all know and love and change the whole thing by adding green food coloring it's just unappetizing and well...."interesting".


So, can we just for St. Patrick's day make green food that is naturally/normally green? Like this Spinach Dip. I think it will save us in the long run. Plus, A LOT of drinking happens on St. Patrick's Day so why not have a little appetizer with your drink?


Spinach and Artichoke Dip
Recipe by Alton Brown

Ingredients
1 cup thawed, chopped frozen spinach
11/2 cups thawed, chopped frozen artichoke hearts
6 ounces cream cheese
1/4 cup sour cream
1/4 cup mayonnaise
1/3 cup grated Parmesan
1/2 teaspoon red pepper flakes
1/4 teaspoon salt
1/4 teaspoon garlic powder

Directions
Boil spinach and artichokes in 1 cup of water until tender and drain. Discard liquid. Heat cream cheese in microwave for 1 minute or until hot and soft. Stir in rest of ingredients and serve hot.

-Aaron John

Saturday, March 10, 2012

Buttermilk Biscuits


So, a couple days ago, an interesting thing happened to me. I was on my way to to class and was waiting for the elevator to get to the Light Rail train station to China town. Then the most random guy began to talk to me saying how it's so windy and "You'll turn into an icicle if you don't get inside somewhere warm". We got into the elevator and he continued to talk about the wind. This guy had a lot to say about it!

You may think that the conversation would end after getting out of the elevator but noooooo. We were a good 30 feet apart and all of a sudden he comes walking up to me talking about his life. He was saying how he lived in California and the person down the street from him owned a rooster and it waked him up at 4 AM every morning. But wait! It gets better. He proceeded to imitate, yes IMITATE, what a rooster would do in the morning including making the sound they make. Who does that?!?! Really?!

Now at this point I began to say to myself "Oh my gosh. This guy is crazyyyyy". Then he let out this loud laugh and I began to nod my head and "laugh" quietly as well. I mean, you never know what's going to happen if you don't laugh when the other person begins to laugh. What else are you supposed to do? After taking public transportation for years, I've learned to always agree with the other person. You always have to be on guard. Luckily, a minute after he did his imitation the Light Rail came and I felt saved. 


So what do buttermilk biscuits have to do with this story? Well, when he did his imitation of a rooster, I began to think about what Country style food people would make on a farm and I thought biscuits, especially with saw mill gravy! I didn't have have sausage to make the gravy so I only made the biscuits that went with it using Alton Brown's recipe. 

When all is said and done, if you ever find yourself in a situation like the one I was in, all I have to say is agree, nod and "laugh"! ha

Buttermilk Biscuits
Recipe by Alton Brown

Ingredients
2 cups flour
4 teaspoons baking powder
1/4 teaspoon baking soda
3/4 teaspoon salt
2 tablespoons butter
2 tablespoons shortening
1 cup buttermilk, chilled

Directions
Preheat oven to 450 degrees.

In a large mixing bowl, combine flour, baking powder, baking soda and salt. Using your fingertips, rub butter and shortening into dry ingredients until mixture looks like crumbs. (The faster the better, you don't want the fats to melt.) Make a well in the center and pour in the chilled buttermilk. Stir just until the dough comes together. The dough will be very sticky.

Turn dough onto floured surface, dust top with flour and gently fold dough over on itself 5 or 6 times. Press into a 1-inch thick round. Cut out biscuits with a 2-inch cutter, being sure to push straight down through the dough. Place biscuits on baking sheet so that they just touch. Reform scrap dough, working it as little as possible and continue cutting. (Biscuits from the second pass will not be quite as light as those from the first, but hey, that's life.)

Bake until biscuits are tall and light gold on top, 15 to 20 minutes.

-Aaron John

Saturday, March 3, 2012

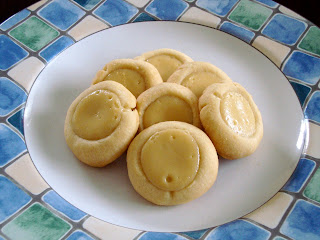
Cheesecake Thumbprint Cookies


Cheesecake is one of those things that is rich and decadent. It definitely is a "Special Occasion" type of treat. But what about a version that you don't have to feel too guilty about? Why not take it a step forward and make it portable as well? So, what do you get when you merge the two? Cheesecake Thumbprint Cookies.


When searching for a recipe, I ended up with one from Cookie Madness which combined the crunchiness of a cookie and the creaminess of cheesecake in one. It starts off with a shortbread like cookie and is filled with a tangy cream cheese filling. This cookie is a process to make but pretty much has all the flavors of a cheesecake.


I would have loved the cookie to have more of a graham cracker flavor but it still was pretty good. You can even add more flavor by adding some jam into the cookie before filling it with the cheesecake. Now that's something I would love to try.

Cheesecake Thumbprint Cookies
Recipe from Cookie Madness (Adapted from Martha Stewart)

Ingredients
Cheesecake filling
4 ounces cream cheese, softened
1/4 cup granulated sugar
1/8 teaspoon salt
1 large egg yolk
1 1/2 teaspoons sour cream
1/4 teaspoon vanilla

Cookie dough
16 tablespoons unsalted butter, softened
1/4 cup granulated sugar
1/4 teaspoon salt
1 large egg yolk
2 cups all-purpose flour

Directions
For the filling beat cream cheese with the sugar and salt until smooth. Mix in egg yolk, sour cream and vanilla. Place into the refrigerator for 30 minutes.

Preheat oven to 350 degrees

For the cookie dough, beat together butter, sugar and salt until creamy. Add the egg yolk until combined and add the flour until it becomes cookie dough.

Scoop out tablespoons of the dough and roll into balls. Place balls onto parchment-lined baking sheets and make an indentation in the center of each ball with your thumb.

Place into the oven and bake for 10 minutes. Remove from the oven and carefully use your thumb to press the middle of the cookies back down, remaking the indentations. Place cookies back into the oven and continue to bake until slightly golden around the edges, about 7 minutes.

Remove cookies from the oven and fill with the cheesecake filling using a teaspoon. Place back into the oven and bake for 7 minutes. Remove from the oven and transfer cookies to a wire rack to cool. When cool, place cookies into the refrigerator to chill.

-Aaron John

LinkWithin

Related Posts with Thumbnails